GateKeeper Quick Start
BotGuard GateKeeper is a protective reverse proxy built around BotGuard bot and hackers detection technology. The core of the product is the Nginx web server which proxies the requests from the outer web to your server, hiding it from bots, hacker attacks, and other kinds of unwanted visitors. We use customized Nginx build that offers additional features:
- BotGuard Nginx module
- HTTP/3 (QUIC)
- OpenSSL 3.0
- TLS 1.3
- Brotli compression
- SSL management (Let’s Encrypt, Buypass)
- Content caching
- L7 DDoS protection
- Client rate limiting
Batteries included! Everything works out of the box and you can start using it with zero SSH/console experience. The application is managed via web application.
Getting Started
Installation
As a prerequisite to installing BotGuard GateKeeper, you must have Debian installed cleanly on your sytem at a minmum of version 12. Then you must add a BotGuard GateKeeper Debian repository and install packages, as described in the following steps:
-
Import the BotGuard package digital signature key by executing the following two commands:
-
Add the BotGuard test repository to your system repositories by executing the following two commands:
echo "deb [signed-by=/usr/share/keyrings/botguard.gpg] https://repo.botguard.net/test/debian $(lsb_release -cs) gatekeeper" | tee /etc/apt/sources.list.d/botguard-gatekeeper.listAlternatively, you can use the production repository instead by executing the following two commands:
-
Install the latest version of BotGuard GateKeeper by executing the following two commands in sequence:
-
Reboot your server to apply the changes to your operating system.
Configuration
The configuration of the BotGuard GateKeeper is done via browser. As a prerequisite, you will need an API key, which is available at your BotGuard dashboard.
In your browser address bar, type the IP address of the deployed GateKeeper instance and hit enter: http://your.instance.ip.address. Then, the web application will ask you to enter your BotGuard API key or register a new BotGuard account to get one. The API key will be used as a password for further GateKeeper management.
After entering a valid API key, the page will refresh and prompt you to enter the username and the password. Use botguard as a username, and your API key as a password.
Domain Setup
Domain validation
When adding a website through the API or in the user interface (UI), BotGuard now validates the domain to ensure that it is active and resolvable. Attempting to add a non-existent domain will result in an error. Additionally, DNS records must be updated to verify domain ownership. Anyone who has the API key can add any website to their account, but nothing happens until the domain owner changes the DNS values. This approach aligns with industry practices, as domain validation is essential to confirm ownership and functionality before proceeding.
To proceed with domain setup, perform the following actions:
-
Select Domains in the top menu.
-
Click the Add domain button.
-
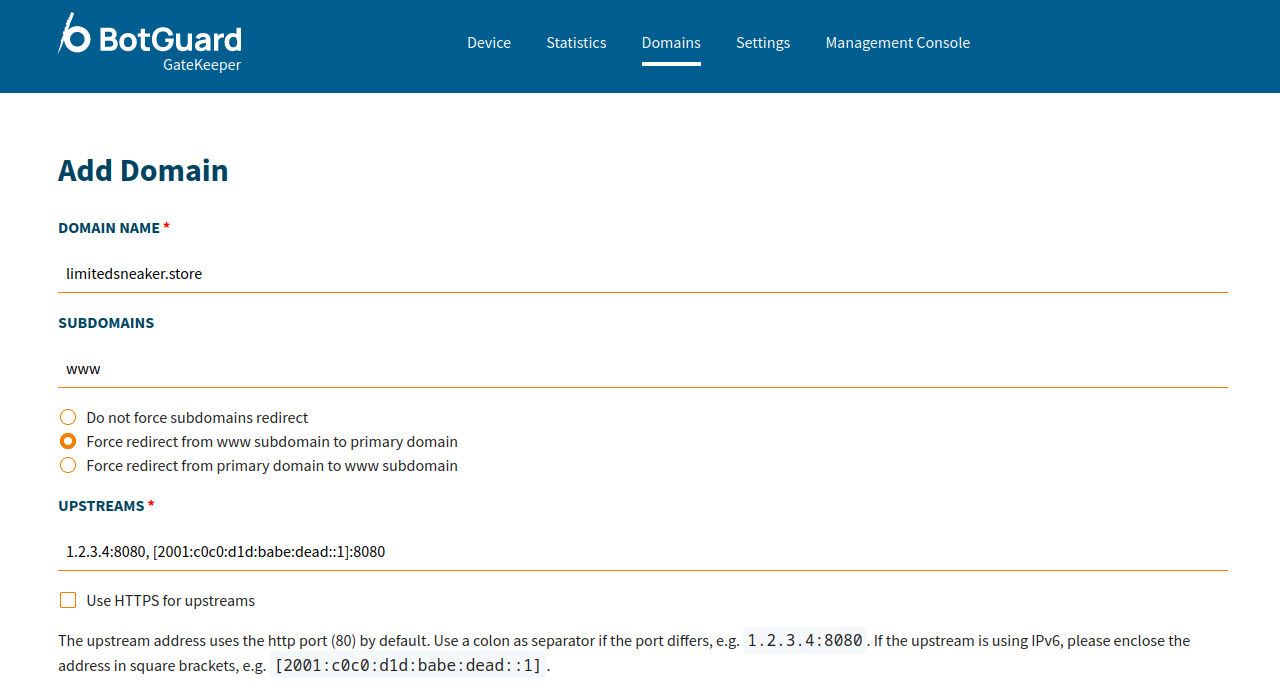
Enter your web application domain name, and subdomains (if any). Non-existent domains will not be added, so ensure that your domain actually exists.
-
Define your application servers addresses in the Upstreams section. BotGuard GateKeeper will try to guess your upstream addresses based on the domain DNS records.
-
Select your preferred SSL certificate vendor or upload your own certificate.

-
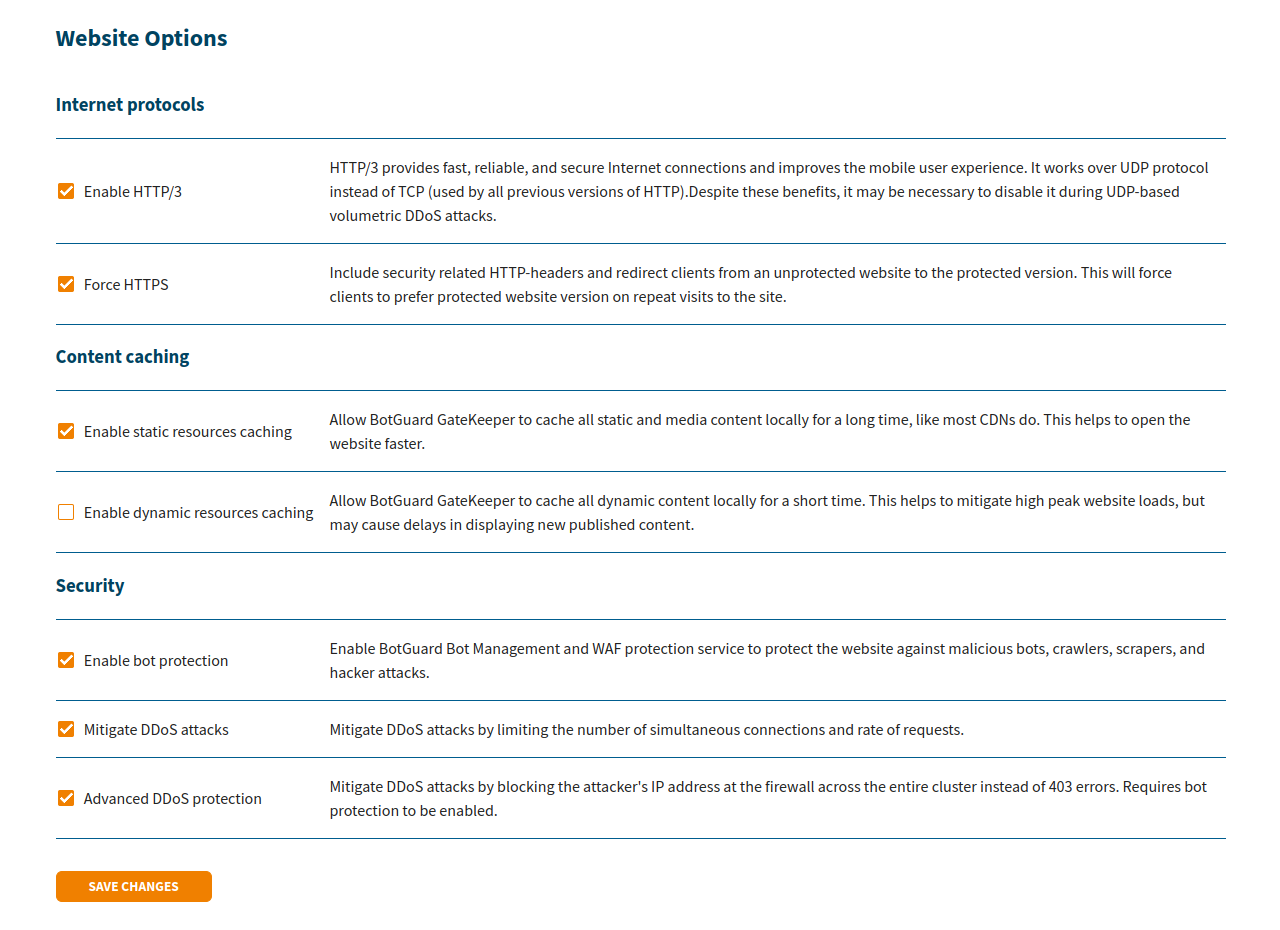
Select additional caching and security settings (don’t forget to enable bot protection) and save the changes.

-
Point your domain A/AAAA records to the BotGuard GateKeeper instance IP address.
Upon the completion of these steps, the GateKeeper will issue an SSL certificate for your site and the traffic will start flowing through the BotGuard GateKeeper to your upstream hosts.
SSL Certificates
BotGuard GateKeeper takes care of your website SSL certificate. It will issue a new certificate upon changing the DNS record, or you could upload your own certificate. BotGuard GateKeeper supports Let’s Encrypt and Buypass as SSL certificate vendors. It also might enable HTTP/3 (QUIC) protocol with TLS 1.3 encryption and optimized security settings, which will help you get A+ score with Qualys SSL Labs online test.
L7 DDoS Protection
Basic Protection
Mitigate DDoS attacks or server overuse by limiting the number of simultaneous connections and rate of requests.
Advanced Protection
A visitor that triggered any of the protection rules from your site settings will be added to the blacklist at server firewall for 1 hour and, hence, unable to send any new requests to the server.
List blocked IP addresses
Add IP address to blacklist
Remove IP address from blacklist
Advanced Firewall Setup
Firewall settings block packets sent from private IPv4 subnets by default. However, such networks are used by the cloud providers infrastructure sometimes. The file /etc/iptables/rules.v4 already contains the rules to ignore some subnets when using certain cloud services. You might need to adjust these settings when using custom VPC networks.